Does salt grow?
No, salt does not grow the way a plant does. It has no seeds, roots, or biological life cycle. You cannot plant it in a garden bed, water it, and harvest more of it. Salt is a mineral, specifically sodium chloride (NaCl), and it forms through a chemical process called crystallization, not through cultivation. That said, there is a very real and satisfying answer to the question 'can you grow salt': yes, you can grow salt crystals at home, and it is easier than most people think. You just need to understand what is actually happening when salt 'grows.'. can i grow. can you grow silver
How salt can 'grow': crystallizing salt vs cultivating crops
When people say they want to 'grow salt,' they usually mean one of two things. The first is harvesting salt from seawater or brine, which is how commercial sea salt is produced. The second, more common DIY interpretation, is growing salt crystals, which is a chemistry process anyone can do at a kitchen counter or outdoors. These are both legitimate and interesting, but they are completely different from growing a crop.
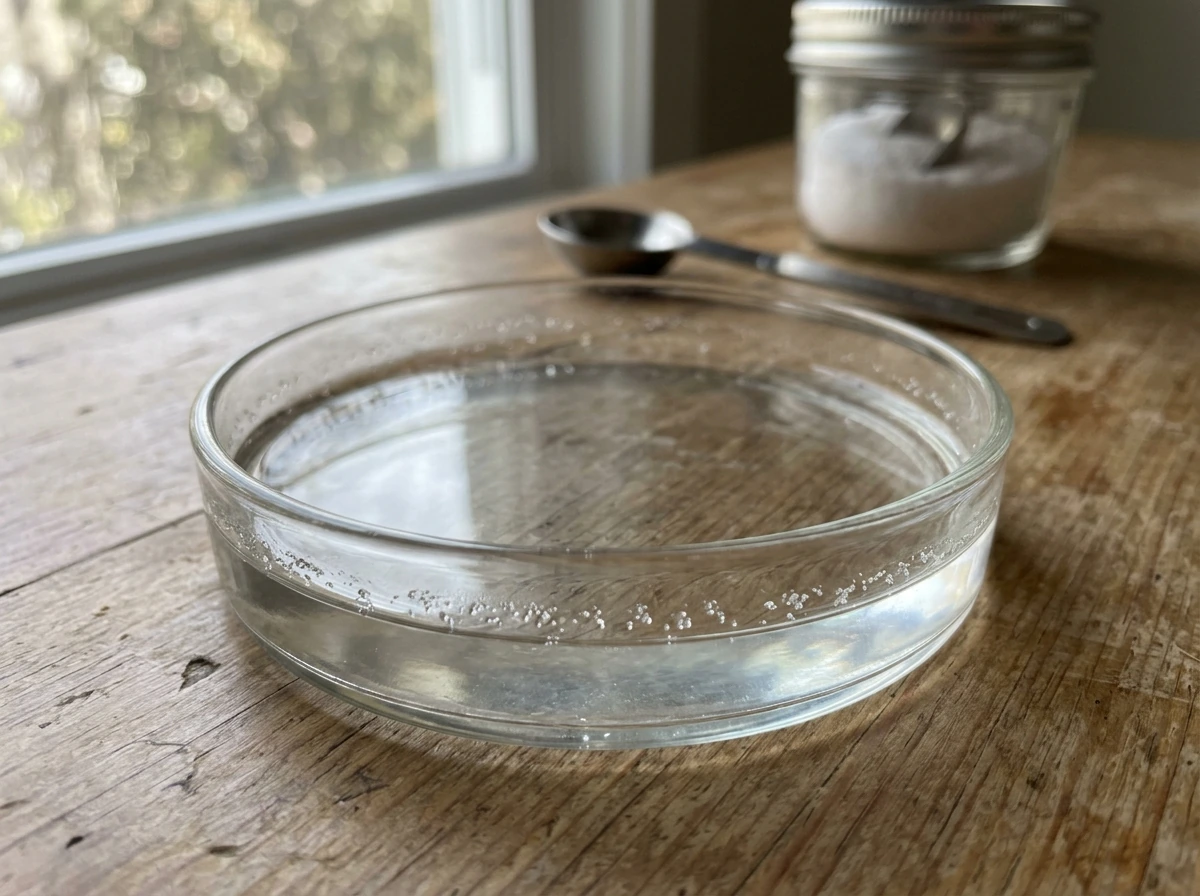
Crystallization is what happens when you dissolve salt in water until no more will dissolve (a saturated solution), then allow the water to leave the solution through evaporation or cooling. As the water disappears, the dissolved salt molecules have nowhere to go and they lock together into the repeating geometric lattice structure that makes a crystal. The more precisely you control that process, the larger and more defined your crystals will be.
This is fundamentally different from This is fundamentally different from growing [growing ashwagandha](/growing-figs-and-jicama/can-you-grow-ashwagandha) or saffron in your backyard, where climate, soil, and region matter in the traditional sense. or saffron in your backyard, where climate, soil, and region matter in the traditional sense. With salt crystals, your 'growing conditions' are water temperature, evaporation rate, and solution purity. Think of it less like gardening and more like controlled cooking chemistry.
What conditions are needed to grow salt crystals
Getting good salt crystals is about controlling a handful of variables. Mess up any one of them and you end up with a cloudy crust instead of clean cubes. Here is what actually matters.
Water source and solution purity
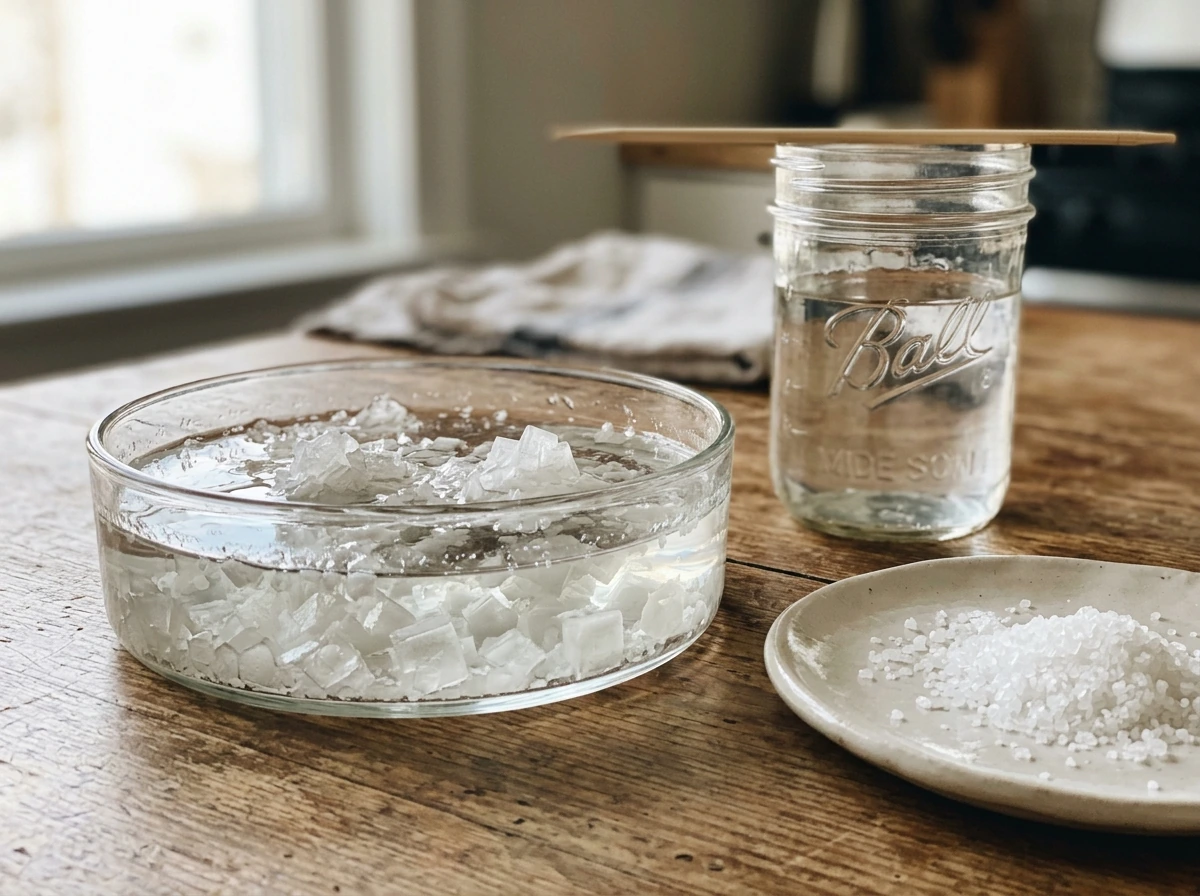
Start with distilled water if you want clear, well-formed crystals. Tap water contains minerals and chlorine that can disrupt crystal formation and produce hazy or irregular deposits. Use pure non-iodized salt, like pickling salt or kosher salt without additives. Iodine and anti-caking agents (common in table salt) interfere with how crystals stack and bond.
Achieving saturation and supersaturation
You need a saturated solution before anything useful will happen. Dissolve salt in hot water, adding more salt than seems reasonable, until no more will dissolve even with stirring. Roughly 36 grams of salt per 100 milliliters of water at room temperature is your saturation point. For faster or more dramatic crystal growth, you want a supersaturated solution: dissolve extra salt in hot water (more dissolves at higher temperatures), then let it cool without disturbing it. A supersaturated solution is chemically unstable, and the slightest disturbance or introduction of a seed crystal will trigger rapid crystallization outward from that point.
Evaporation rate
Slow evaporation produces large, well-formed cubic crystals. Fast evaporation produces a crust of many tiny crystals clumped together. To grow one impressive single crystal, you want a wide, shallow container in a location with gentle air movement and consistent, moderate temperature. Covering the container loosely with a paper towel lets moisture escape slowly while keeping dust out.
Temperature and humidity
Room temperature between 65 and 75 degrees Fahrenheit is ideal. Cooler temperatures slow evaporation almost to a standstill, while high heat evaporates water too quickly for crystals to form cleanly. Humidity is the factor most US growers underestimate: high humidity (above 75 percent relative humidity) dramatically slows evaporation and can prevent crystals from forming at all. If you live in a humid climate like Florida, Louisiana, or coastal Georgia, you will have a much harder time growing salt crystals on an open countertop than someone in Arizona or New Mexico where the dry air pulls moisture out of a solution within hours.
Where salt 'grows' in the real world
Salt deposits form naturally wherever water carrying dissolved salts evaporates faster than it is replenished. The most dramatic examples are salt flats like the Bonneville Salt Flats in Utah and the Salar de Uyuni in Bolivia, where ancient inland seas evaporated over millennia and left behind thick crusts of halite (natural sodium chloride). In the US, the Great Salt Lake region is a living example of this process still happening today.
Commercial sea salt is produced in evaporation ponds, also called salterns or solar salt works, where shallow coastal brine is channeled through a series of ponds and allowed to concentrate progressively under sunlight and wind. The salt is then harvested by mechanical scrapers when crystals accumulate on the pond floor. The key conditions in all these natural and commercial settings are the same ones you replicate at home: a brine source, sun and wind to drive evaporation, and warm dry conditions.
From a US regional angle, the driest and warmest states, particularly Arizona, Nevada, Utah, New Mexico, and parts of California, are the most naturally favorable for outdoor salt crystallization. The Pacific coast of California even has small artisan sea salt operations doing exactly this on a small scale. Humid southeastern and midwestern states can still produce crystals indoors with a little climate control.
Common methods you can do today
There are three practical approaches depending on how fast you want results and what kind of crystals you are after. [can you grow food in antarctica](/growing-figs-and-jicama/can-you-grow-food-in-antarctica)
Method 1: Simple evaporation (overnight to a few days)
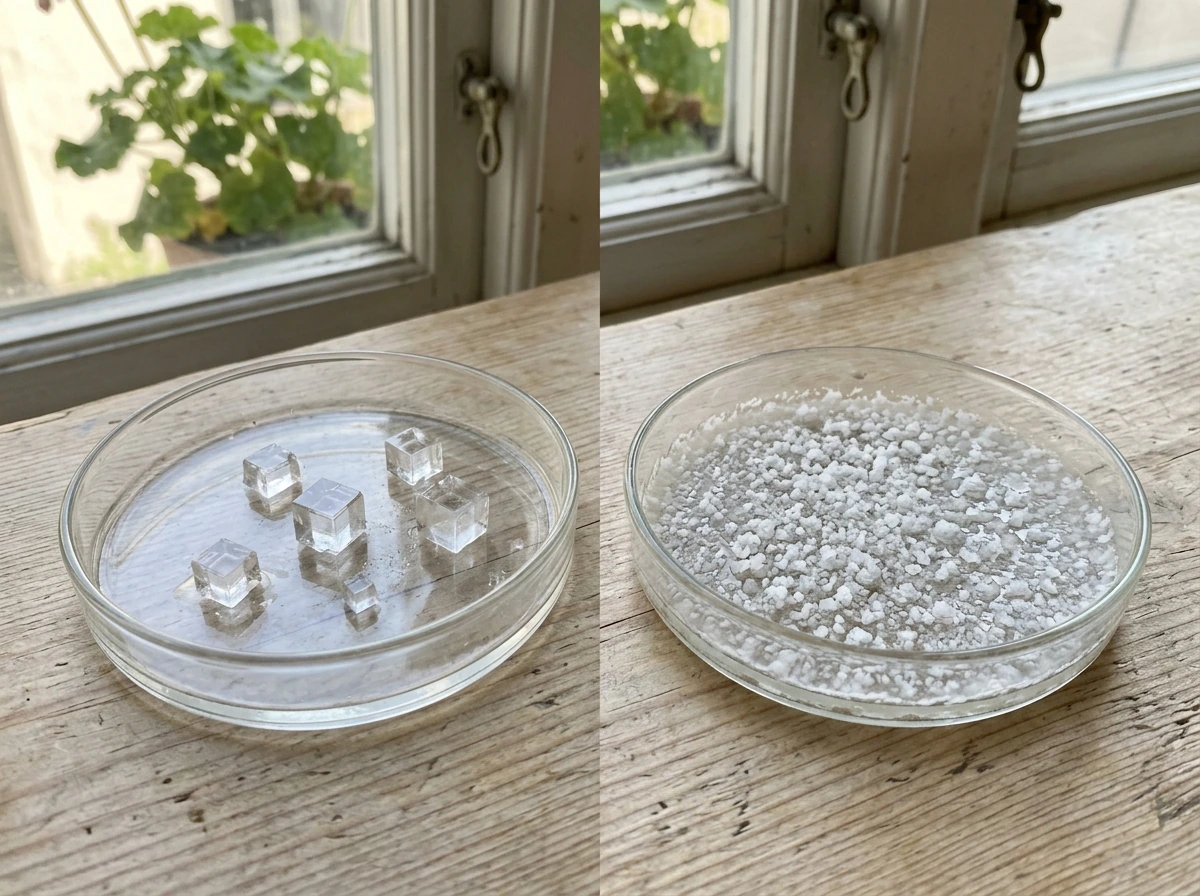
- Heat one cup of distilled water to near boiling.
- Stir in non-iodized salt one tablespoon at a time until no more dissolves (roughly 6 to 8 tablespoons).
- Pour the clear solution (leave any undissolved salt behind) into a wide, shallow ceramic or glass dish.
- Place the dish in a dry, undisturbed location with mild airflow. A windowsill in a dry room works well.
- Cover loosely with a paper towel to keep dust out.
- Check after 24 hours. In low-humidity environments, you may already see small cubic crystals forming on the bottom and edges of the dish.
- Leave undisturbed for 2 to 5 days for larger growth.
Method 2: Seed crystal method (for growing a single large crystal)
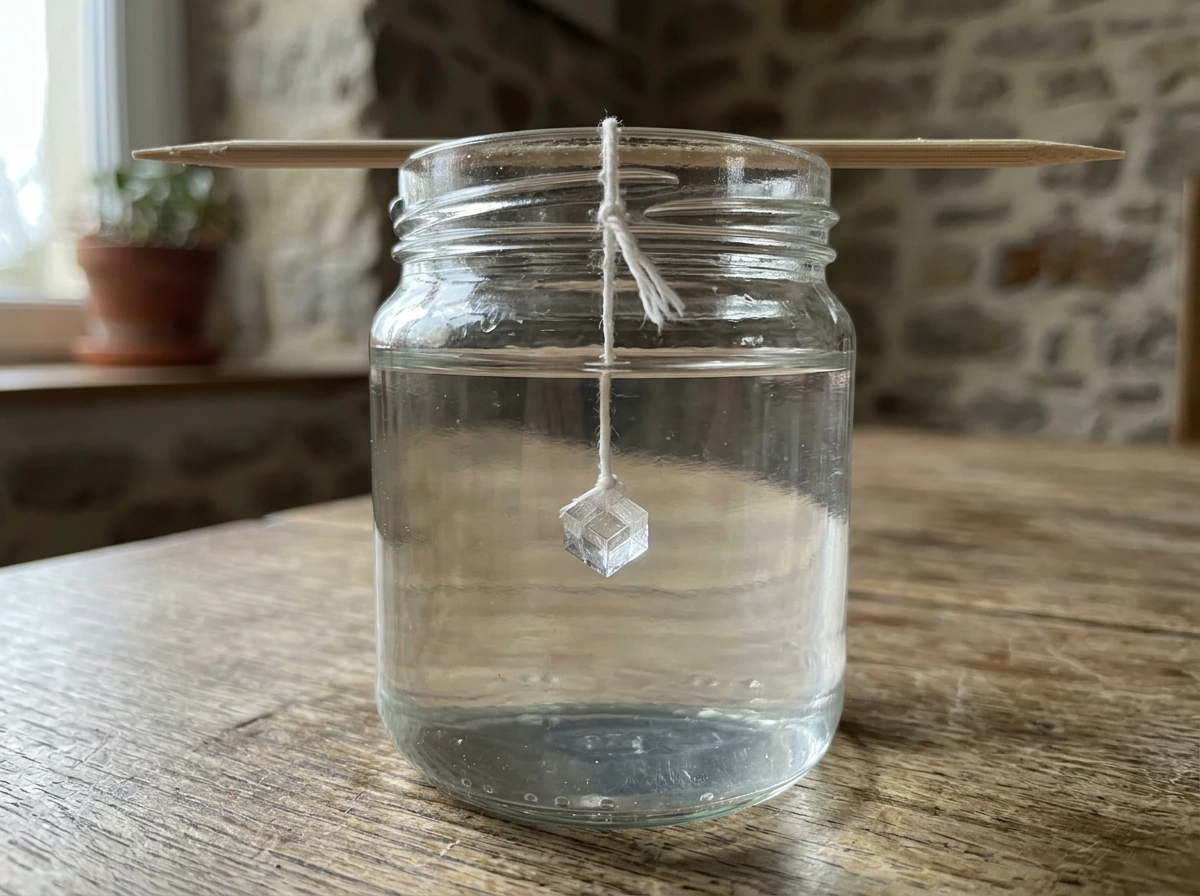
- First, use the evaporation method above to produce a small batch of crystals after 24 hours.
- Select one well-formed cubic crystal (your seed crystal).
- Tie it to a length of thin nylon fishing line and suspend it in a fresh jar of saturated salt solution so it hangs in the middle of the liquid, not touching the sides or bottom.
- Cover the jar loosely and leave it in a dry location.
- Every few days, pour off and replace the solution with a fresh saturated solution to maintain concentration.
- After one to two weeks, you should have a noticeably larger single cubic crystal.
The seed crystal method works because a supersaturated solution is unstable and will crystallize outward from any existing crystal surface it contacts. You are directing all that crystallization onto one single anchor point instead of letting it scatter across the bottom of a dish.
Method 3: Cooling/forced crystallization (fastest results)
- Dissolve as much salt as possible into very hot water (near boiling).
- Filter the solution through a coffee filter to remove any particles.
- Let the solution cool slowly to room temperature without disturbing it.
- If it does not crystallize on its own, drop in one tiny salt crystal as a seed.
- Crystals should begin forming within minutes to an hour.
- This method produces results quickly but crystals are usually smaller and less uniform than the slow evaporation method.
| Problem | Likely Cause | Fix |
|---|
| No crystals after several days | Solution was not fully saturated, or humidity is too high | Remake solution with more salt and hot water; move to a drier location or use a fan to increase airflow |
| Only a thin white crust, no defined cubes | Evaporation was too fast, or salt had additives | Switch to non-iodized pickling salt and distilled water; slow down evaporation by covering more |
| Crystals dissolve overnight | Room humidity is too high (above 75% RH) | Move indoors near AC, use a dehumidifier, or try the project in a drier season |
| Crystals look cloudy or milky | Tap water minerals or salt additives in the solution | Use distilled water and additive-free salt only |
| Seed crystal dissolves instead of growing | Solution was not saturated enough when seed was added | Make a fresh, fully saturated solution before introducing the seed crystal |
| Very slow growth over many days | Temperature too cool or evaporation rate too low | Move to a warmer spot (68 to 75°F), add gentle airflow, or use a slightly wider dish |
Safety and practicality tips
Salt crystal growing is one of the safer chemistry projects you can do at home, but a few practical points are worth knowing before you start. can you grow gold
Edible vs non-food crystals
Crystals grown from food-grade non-iodized salt in distilled water using clean ceramic or glass containers are technically edible. That said, unless you took careful precautions throughout, treat them as display or educational items. Dust, container residue, and handling can all introduce contaminants. If your goal is actually harvesting salt for cooking, the evaporation method in a clean glass dish with food-grade materials is fine. If you used any non-food containers, dyes, copper wire, or other materials (sometimes used in craft crystal projects), do not consume the results.
Materials to use (and avoid)
- Use glass or ceramic containers. Metal containers can react with salt solutions and introduce off-flavors or discoloration.
- Avoid galvanized or aluminum containers entirely, especially if you plan to taste or cook with the result.
- Nylon fishing line or food-safe cotton string works well for suspending seed crystals. Avoid metal wire unless it is food-safe stainless steel.
- Use distilled or filtered water whenever possible. Hard tap water leaves mineral deposits that cloud crystals.
- Non-iodized pickling salt or canning salt is ideal. Standard table salt with anti-caking agents will produce messy, irregular crystals.
Cleanup
Salt solution cleanup is straightforward: rinse containers with warm water. Salt dissolves easily and leaves no residue beyond a thin mineral film on glass, which wipes off. If brine spills on a wood surface, wipe it immediately as salt can damage wood finishes over time. Discard leftover saturated solution down the drain with plenty of water to avoid it drying into salt deposits in your pipes.
A note on your local climate
Where you live in the US makes a real difference to how easily this works. If you are in the arid Southwest, you can practically leave a saturated dish on a porch and have crystals by morning. If you are in the humid Southeast or Pacific Northwest, you will get much better results indoors with air conditioning running, especially if you’re wondering, [can you grow your own food in oregon](/growing-figs-and-jicama/can-you-grow-your-own-food-in-oregon). The principle behind commercial sea salt operations in dry coastal California, using sun, wind, and shallow ponds to concentrate brine, is exactly what you are replicating in miniature on your countertop. Match your setup to your local conditions and you will save yourself a lot of frustration.